Detailed documentation about all features and settings of the Audio and Video Player.
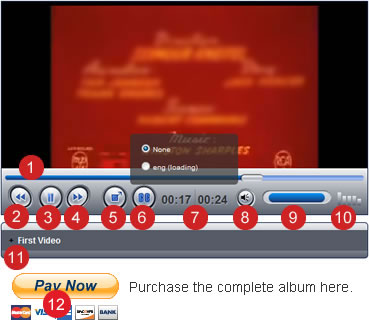
1.The progress bar. Shows the playback progress. This bar enables us to move quickly to a new position (both forward and backward) in the file's playback, just by clicking on the desired position.
2.The previous track button enables us to go to the preceding audio file.
3.The play/pause button.
4.The next track button. Allows us to go to the next file of playlist.
5.The fullscreen button. Allows us to set the video in fullscreen mode.
6.The subtitle button. Allows us to select an subtitle for the video.
7.Time indicator. Shows the elapsed time since file playback started and video duration.
8.The mute button sets the volume to on/off.
9.Equalizer. The equalizer shows in an approximate way how the audio volume behaves during playback.
10.The playlist. Allow us to select the audio file to playback. The audio being played it is displayed in a different color in the playlist. The plus simbol front item on playlist allows us to go to a webpage with additional video information.
11.Pay now button.
The description of music player interface is based on Classical Skin. Other skins have similar features. Some skins don't have all the options due to size or aesthetic limitations.
To install the WordPress plugin follow these steps:
The audio and video players can be generated directly in the pages and posts, or through the players gallery if you want insert the same player in multiple pages.
Please, watch the following video tutorials:
Creating an audio player.
Creating a video player.
Creating the player directly into the page/post generates shortcodes similar to:
[cpm-player skin="ball-skin" width="100%" playlist="true" type="audio"]
[cpm-item file="http://www.wp.local/wp-content/uploads/2020/11/1.mp3"]Audio 1[/cpm-item]
[cpm-item file="http://www.wp.local/wp-content/uploads/2020/11/2.mp3"]Audio 2[/cpm-item]
[cpm-item file="http://www.wp.local/wp-content/uploads/2020/11/3.mp3"]Audio 3[/cpm-item]
[/cpm-player]
The attributes supported by the [cpm-player] are:
skin - determines the skin to use with the player: ball-skin, bar-skin, beau-skin, blue-skin, button-skin, classic-skin, fine-skin, playpause-skin, steel-skin and stylized-skin
type - the player's type: audio or video
width - the player's width
height - the player's height
dir - the name of a subdirectory of the "/wp-content/uploads" directory, or the "/" symbol to generate a playlist with all media files in the "Uploads" directory
playlist - to display or not the playlist, possible values: true or false
playlist_download_links - to include download links in the playlist items. Possible values: true or false
autoplay - makes the player autoplayable, possible values: true or false
preload - preload or not the media files, possible values: auto, metadata or none
loop - play the audio files in the playlist in a loop, possible values: true or false
shuffle - selects the playlist items randomly, possible values: true or false
class - assigns custom class names to the players' containers
secure - allows to disabled the protection for a specific player when if the audio files protection is enabled, possible values: true or false
Pay attention: The following behaviors can be affected depending on the browser or device used for playing: autoplay, loop, or play the items in the playlist automatically.
The dir attribute allows to generate the playlist with all media files into the directory and its subdirectories. For example, to generate a playlist including all media files into the "/wp-content/uploads/2020" directory, the shortcode would be: [cpm-player skin="ball-skin" width="100%" playlist="true" type="audio" dir="2020" /]
The use of dir allows you to add new files or delete the existing ones and the playlist would be refreshed dynamically.
The attributes supported by the [cpm-item] are:
file - url to the audio or video file
name - the text to display in the playlist (it can be defined too as the text between the open and close shortcode)
poster - url to the image file to display as item's cover
link - url to a webpage with additional information about the item
subtitle - url to a subtitle file (the subtitles are text files in WebSTR format)
lang - indicates the subtitle language, for example: ENG, ESP
The skin attribute , type if it is a video or audio player. Every item is defined with [cpm-item] shortcode, where the file attribute includes the URL to the media file, and the text into the open and close shortcode the text to display in the playlist.
Press the "Audio and Video Player" option in the WordPress menu, the settings page of the plugin includes the list of already generated media players, with the button to edit them. A section to create a new media player, where you should select the player's type: Audio or Video, and press the button "Create new media player".
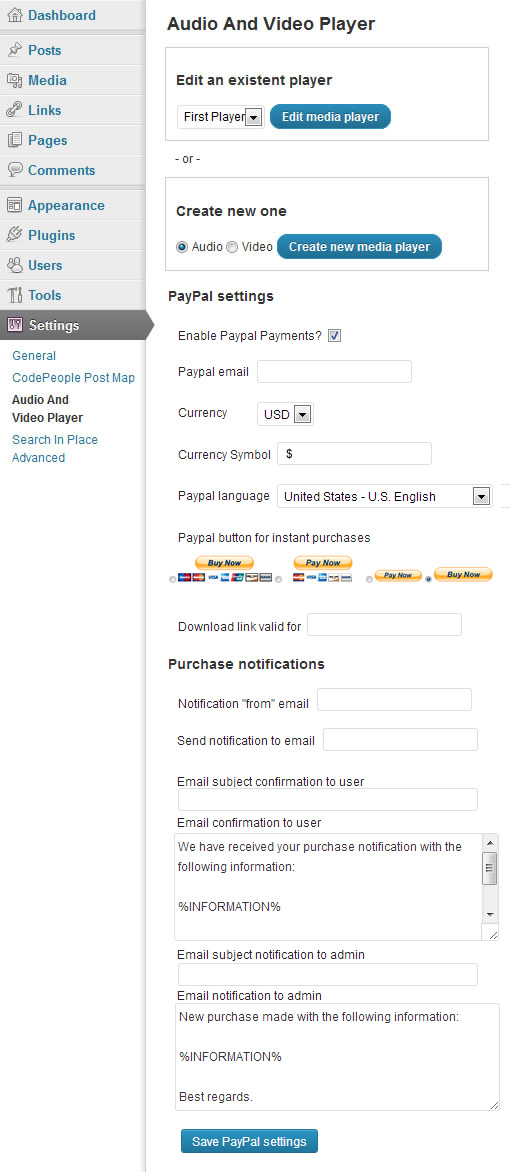
The settings page of the plugin includes a section to integrate the Audio and Video Player with PayPal and use it as a simple store.
The plugin allows protecting the audio files with a watermark audio or truncate the original audio files for demos.
If your server includes the FFMpeg application, you can enable the audio files protection from the plugin's settings. You only need to enter the path to the FFmpep application and select the audio file to use as the watermark and/or enter the duration in seconds of the resulting audio files for demos.
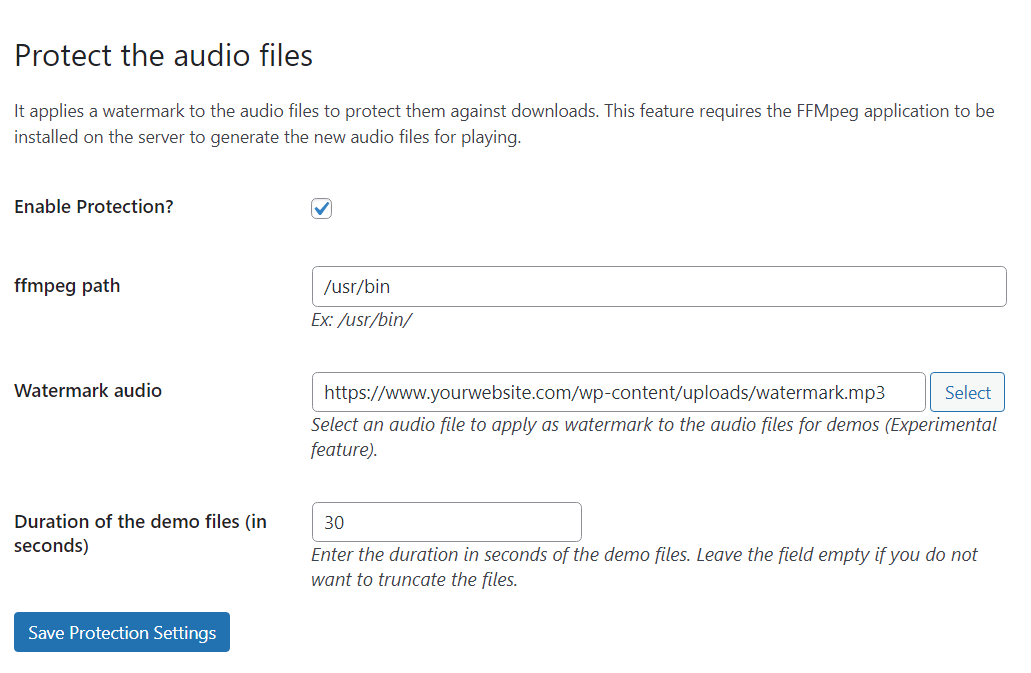
The plugin will generate new audio files for demos with the watermark audio in the background and attenuated volume and/or the duration you enter.
If the users download the audio files for demos from your website, they will contain the watermark audio layer and/or a partial copy of the original audio file.
The media player allows you to sell digital files using PayPal as a payment gateway. This feature gives the possibility to include only some elements as a demonstration, but to sell the whole album.
Enable Paypal Payments?: Enable the PayPal account.
Paypal email: Enter the email associated to the PayPal account.
Currency: Select the currency for selling.
Currency Symbol: Enter the currency symbol.
Paypal language: Select the PayPal interface's language.
Paypal button for instant purchases: Select the PayPal button to use in website.
Download link valid for: Enter the number of days to restrict the download link.
Notification "from" email: Enter the email address to use as "from" attribute in the notification emails.
Send notification to email: Enter the email address to receive the sales notifications.
Email subject confirmation to user: Enter the subject of notification emails sent to the buyers.
Email confirmation to user: Enter the content of notification emails sent to the buyers ( don't remove the text %INFORMATION%, it will be replaced by product's information)
Email subject notification to admin: Enter the subject of notification emails sent to the seller.
Email notification to admin: Enter the content of notification emails sent to the seller ( don't remove the text %INFORMATION%, it will be replaced by product's information)
The preferred and straightforward alternative to create new players (audio and video players) is directly into the page's and posts. But in some situations, you would prefer to create the player in a single place and insert it on multiple pages of the website. You can generate the player from the gallery and insert its shortcode into the pages' contents.
After select a media player to edit or create a new one, a new screen allow you to enter the player's features.
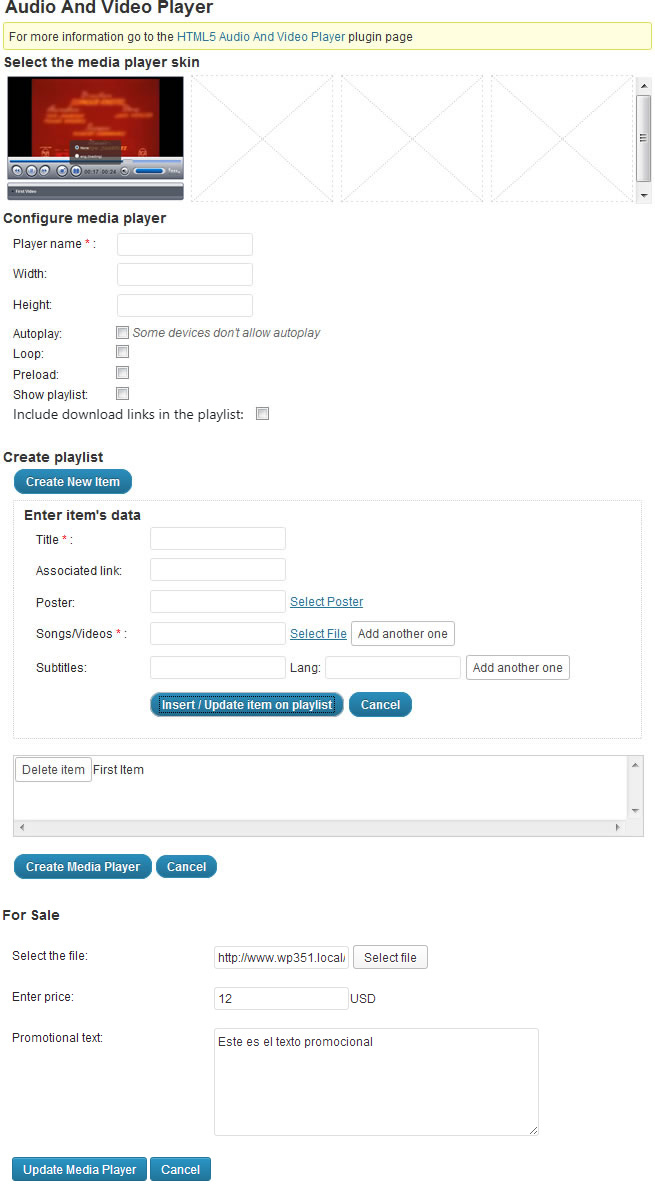
Select the skin: the first skin will be selected by default.
Player name: mandatory field that will allow to identify the media player for the insertion process on your website.
Width: Enter the width of the media player. Under the field you will see the values recommended for the selected skin. Every skin has a different recommended value.
Height: Enter the height of the media player. Under the field you will see the values recommended for the selected skin. Every skin has a different recommended value.
Autoplay: Mark the checkbox if you want your media player to initialize in "ON" mode.
Note: Some devices do not support autoplay.
Loop: Allows cyclical playback of the playlist. This feature may be limited on devices that do not support autoplay.
Preload: Allows you to pre-load media files to streamline the playback process. Some mobile devices do not allow file preload.
Show playlist: Displays or hides the playlist.
playlist_download_links: Includes download links in the playlist items.
To create a playlist please press "Create New Item". The data associated with a playlist item are:
Title: mandatory field that will identify the item in the playlist.
Associated link: URL to a web page with information associated to the item.
Poster: URL to an image associated to the item, only available with the video type media player.
Songs / Videos: mandatory field where you enter the URL to the media file. Browsers support different multimedia file formats, therefore it is advisable to enter different formats for the same item, enabling each browser to select the file format that it supports.
Subtitles: Enter the URL to the subtitle file and the subtitle language.
After entering all data item press "Insert / Update item on playlist"
Select the file: Select the file for selling.
Enter price: Enter the file's price.
Promotional text: Enter a promotional text.
The audio and video players can be created directly in the pages and posts, or inserted from the players gallery.
Please, watch the following video tutorials:
Creating an audio player.
Creating a video player.
Inserting the player from the gallery.
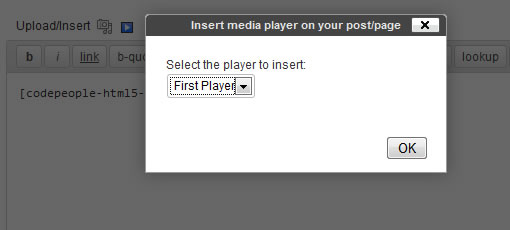
To insert the media player in your website go to the editing of posts / pages and click the icon for Audio and Video Player in the web editor. This will load a window where you will be able to select your media player. After inserting the media player save the changes on the website.
The previous action inserts into the page/post content a shortcode with the structure:
[cpm-player id="1"]
of course with the corresponding player's id.
Note: If you know the player's id, you can insert the shortcode directly into the post/page content without pressing the icon.
If you want or need to insert the shortcode directly into the template files of the theme active on the website, the piece of code would be:
<?php print do_shortcode('[cpm-player id="1"]'); ?>
For checking the sales reports, press the menu option "Sales Report" and select the interval of time for checking. The sales report displays the list of sales in the selected interval and the total amount distributed by currencies.
The audio files supported by the player are: MP3, OGG, WAV.
and the video files: MP4, OGG and WebM.
It is possible display subtitles with the videos, the must be text files in WebSTR format.